Production Level Load Balancing Using SSM Enabled EC2 Instances in Private Subnets
We all know Load Balancing is a way of dealing with High Availability in any Cloud deployment. In AWS, we have three types of Load Balancers (Classic, Application and Network).
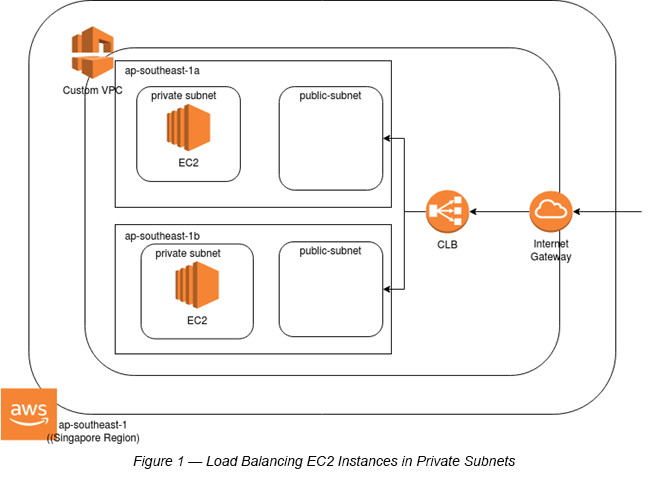
Most of the Load Balancing examples in different learning materials have their AWS EC2 instances deployed in public subnets. Though this works well in developer/testing environment(s), it is not a production-ready setup. So, it is highly recommended to deploy these in private subnets. The Load Balancer, which is attached to two public subnets (by default) can eventually invoke these two subnets within their respective Availability Zones (See Figure 1).
Why AWS SSM (AWS System Manager)?
This example uses AWS SSM to install Apache on respective EC2 instances. Rather than exposing port 22 (SSH) and compromising the EC2 instances, it is best practice to use AWS SSM, which basically can do custom installation on selected EC2 instances with the help of predefined SSM Documents. These Documents can be executed via AWS SSM RUN Command [1].
Steps
Step 1:Create a Custom VPC with two public subnets and two private subnets in two Availability Zones (That means each AZ has a public and private subnet each).
Step 2 : Go to AWS Console and go to EC2.
Step 3 : Select Load Balancers.
Step 4 : Create a Classic Load Balancer (CLB) with the following parameters:
P. Note: I have chosen a CLB to minimize the number of steps required in this example. In theory, there is no difference in terms of the number of steps required in this particular example, whether it is a CLB or an ALB. However, it is always good to select an ALB in production level deployments.
Create LB inside: <Select the Custom VPC>
Create an Internal Load Balancer: <Do not select it>
Listener Configuration: <Select HTTP Port 80> [This is the default setting]
Subnets: <Select both public subnets that you have created within your Custom VPC>
Security Group: <Create a new Security Group with HTTP (80) access. e.g. myclb-sg>
Health Check Parameters: <Response Timeout : 2 sec ; Interval: 30 sec ; Unhealthy Threshold: 2 ; Healthy Threshold: 10>
EC2 instances: <You can skip this for the moment>
Click the Create Load Balancer button to complete the initial settings of the Load Balancer creation process.
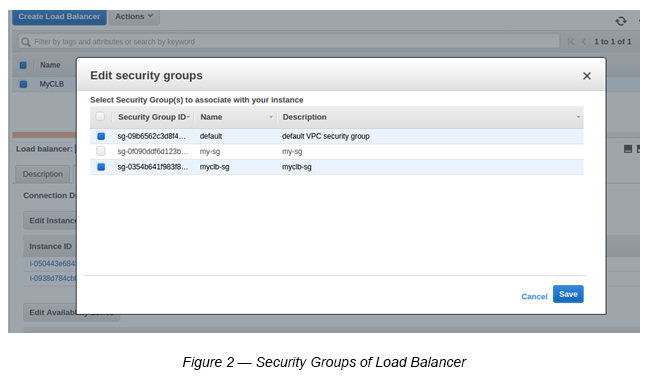
Step 5 : Add Custom VPC Default Security Group to Load Balancer
This is required since EC2 instances are in private subnets, and Load Balancers need to communicate with respective private subnets within their Availability Zones. For example, public subnet 1 needs to communicate with private subnet 1 within us-east-1a and public subnet 2 needs to communicate with private subnet 2 within us-east-1b.
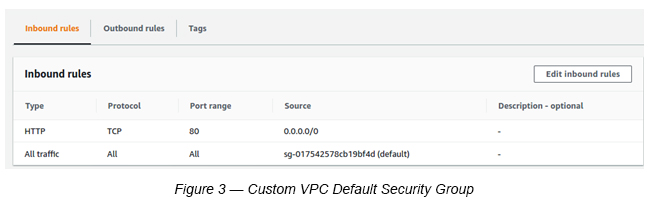
Make sure to add port 80(HTTP) to the Default Load Balancer. This is not the default setting (See Figure 3).
Step 6 : Add EC2 instances to the created Load Balancer.
Create two EC2 instances (Amazon Linux t2.micro) in each private subnet.
While creating EC2 instances make sure to follow the below guidelines:
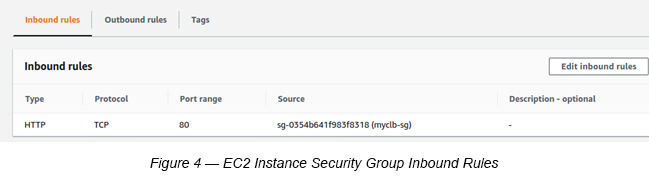
1. Create a new Security Group with HTTP port 80 access (Source as Load Balancer Security Group (myclb-sg)) — (See Figure 4). There is no need to have port 22 access to install Apache here. The Apache installation is completed via SSM RUN Command (See Figure 5).
2. Create a new IAM Role (to access AWS SSM) and assign it to each EC2 instance.
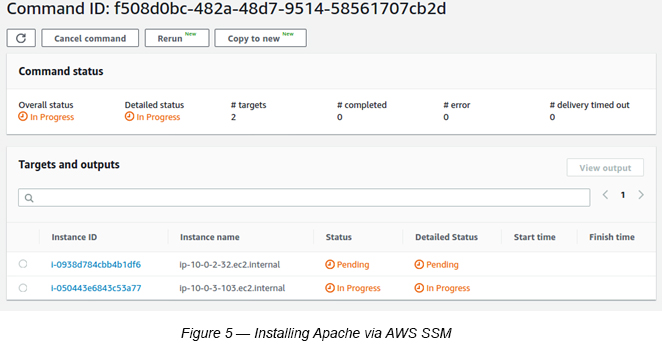
The above steps basically create two EC2 instances with SSM access. Within SSM, you can execute a SSM Custom Document using SSM RUN Command to install Apache in both instances [1].
Once you complete installing Apache, you are ready to attach both the instances to the created CLB.
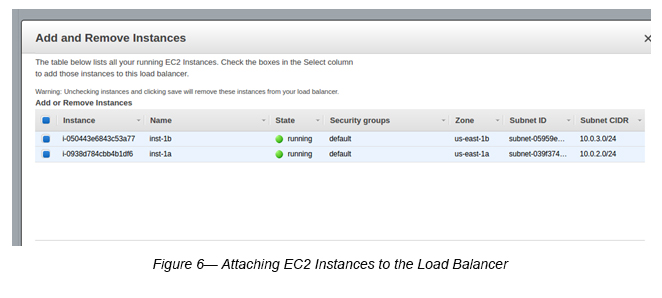
Step 7 : Attaching EC2 instances to the Load Balancer.
Go to EC2 -> Load Balancers -> Select the Load Balancer (MyCLB) -> Select Actions -> Select Edit Instances -> Attach two EC2 instances to the Load Balancer (See Figure 6).
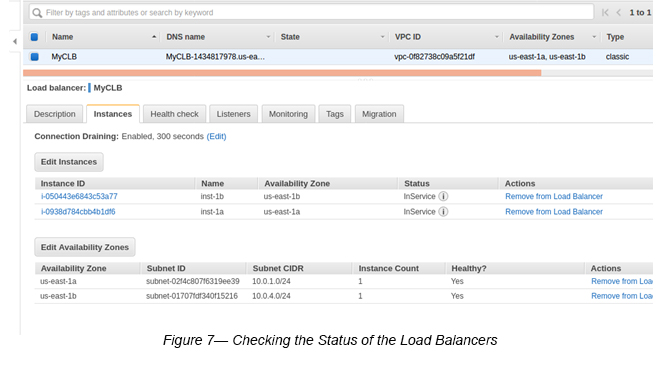
Step 8 : Check the Load Balancer Status.
Once above steps are completed, you may go and check Load Balancer status.
Select the Load Balancer -> Select the Instances tab.
If you see the Instances status as “InService” then your two EC2 instances are in the healthy state (See Figure 7).
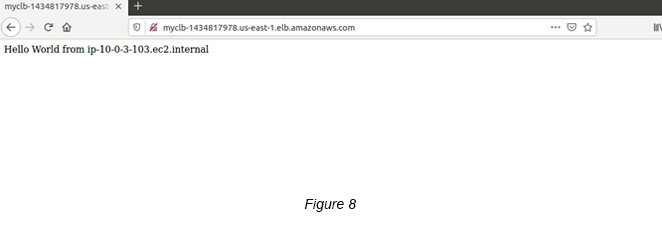
Step 9 : Check whether the Load Balancer runs properly.
Select the the Load Balancer -> Click the Description tab -> Copy (Ctrl +C) the DNS name (e.g. MyCLB-1434817978.us-east-1.elb.amazonaws.com).
Paste the DNS name on a web browser and see if all is okay. If you see a similar page as below (See Figure 8), Congratulations!
References
1. AWS SSM Documents https://docs.aws.amazon.com/systems-manager/latest/userguide/sysman-ssm-docs.html

Crishantha Nanayakkara
Vice President - TechnologyDeveloping a Custom Audit Trail and a Notification Service for a Workflow Based Serverless Application on AWS
READ ARTICLE
Human Emotions Recognition through Facial Expressions and Sentiment Analysis for Emotionally Aware Deep Learning Models
READ ARTICLE