Using AWS ACM with CloudFront and Route 53 to Secure your Cloud Domains
If you’re into AWS System Operations, you may have come across certain bottlenecks while using AWS CloudFront with AWS Certification Manager (ACM). Though this process looks a pretty straight forward one, there are certain finer points that you need to be mindful about.
So let’s dive into this step by step.
Prerequisites
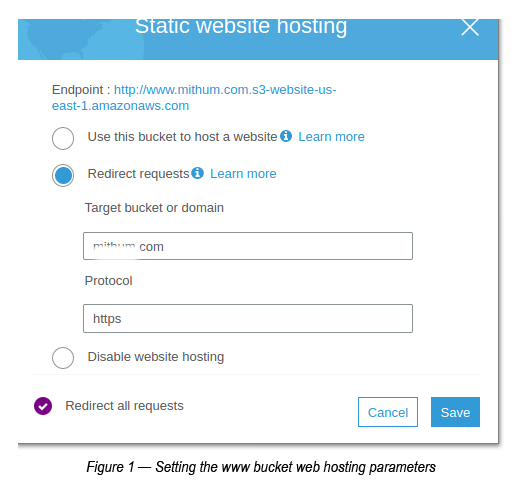
- Create a S3 bucket, which has a similar name to the Domain name. [When you create the S3 bucket, make sure to create a bucket name that is similar to the Internet Domain Name that you’re trying to map to. Also, ensure that you create a bucket with the “www” prefix as well to route the traffic to the bucket which has the Domain Name. For example, if your domain name is mydomain.com, you are required to create a bucket with the same name (mydomain.com) and another bucket named mydomain.com. See Figure 1 to see how you set the web hosting parameters of the www bucket]
- You need to create a Hosted Zone with DNS Servers. In Route 53, you can create a Hosted Zone for the required domain. [Generally the Hosted Zone is created when you create a Domain within Route 53. But, there are instances where the Domain is created in some other AWS account or somewhere entirely different].
Creating an X509 Certificate using AWS ACM (Certification Manager)
It is always recommended to connect your website with HTTPS to secure the channel between your browser and the Cloud Servers.
In the past, if you have dealt with requesting for a Certificate signed by a Certifying authority you know the pain that you went through! To me, AWS ACM is just a breeze. Let’s follow the steps given below to find out how.
- Go to the AWS Certification Manager (ACM) and make sure you’ve chosen the region as N. Virginia (us-east-1). Apparently, CloudFront still only supports us-east-1 certificates. If you have chosen any other region to create certificates you may face some issues while creating your CloudFront distribution. So use us-east-1.
- Click Request a Certificate.
- Select Request a Public Certificate -> Click Request Certificate
- Under Add Domains, add domains that you want to validate with the Certificate (P.Note: You are required to mention all the domains and sub-domains here if you are planning to use this certificate for any of these domains in the future).
- Select the Validation Method as DNS Validation.
- Ignore Tags unless you want specify anything -> Click
- Do a final review and click the Confirm and requestbutton to create the certificate.
- Once confirmed, the Certificate Request will be in the pending validation state, which needs to be confirmed by us in order to proceed. You may click the side arrow (in the 2nd column) to view the validation requests. If you have requested the certificate for domains such as mydomain.com and mydomain.com, you will have to confirm two validation requests under this.
- Once you confirm the validation for both the domains requested, two CNAME entries will be added to the Route 53 hosted zone (i.e. if you have already setup a domain under a hosted zone in Route 53).
- Finally a certificate (Amazon) will be generated for you for the requested domain(s).
Creating the CloudFront Distribution
- Go to CloudFront -> Click Create Distribution.
- Select Web Distribution.
- Under Create Distribution -> Set the Origin Domain Name (Here you will need to select the web hosting URL of the S3 bucket. You can go to S3 bucket -> Properties -> Web hosting URL and paste it here without the http part. You need to make sure to not use the S3 bucket URL in the dropdown.
- Set Redirect HTTP to HTTPS (under the Viewer Protocol Policy).
- Under Distribution Settings -> Add two entries to Alternate Domain Names (P.Note: You are required to set both mydomain.com and mydomain.comhere in order to populate Route 53 with CloudFront Distributions. Failing to specify this means you will not see them in the Route 53 Alias dropdown list).
- Set the other values as they are and click Create Distribution
Setting Route 53 with CloudFront Distributions
-
Once you’ve completed the above steps, now you’re in a position to set two Record Sets for each domain (mydomain.com and Error! Hyperlink reference not valid.
Record Set Parameters for mydomain.com:
Name: mydomain.com
Type: Alias
Alias: Yes
Alias Target: <Select the CloudFront Distribution from the dropdown relevant to the domain name mydomain.com>
Record Set Parameters for www.mydomain.com:
Name: www.mydomain.com
Type: Alias
Alias: Yes
Alias Target: <Select the CloudFront Distribution from the dropdown relevant to the domain name www.mydomain.com>
Once you’ve completed the above steps, make sure to give it a few minutes so that the new A record settings can be propagated to the respective domain. You can use the dig command to view the status of this update. If A Record is properly shown in the dig command you’re all set to explore everything that you’ve done. Congratulations!

Crishantha Nanayakkara
Vice President - TechnologyDeveloping a Custom Audit Trail and a Notification Service for a Workflow Based Serverless Application on AWS
READ ARTICLE
Human Emotions Recognition through Facial Expressions and Sentiment Analysis for Emotionally Aware Deep Learning Models
READ ARTICLE