Creating a Site-to-Site VPN between AWS VPC and a third-party network using Openswan
Most third-party applications have restricted access through the public Internet due to an organization’s security boundaries
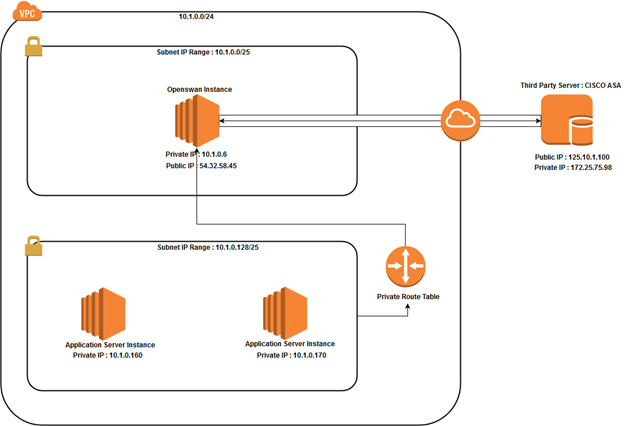
If applications are hosted in AWS, creating a site-to-site VPN can provide access to these kind of networks. In this post, we explain the steps to create a site-to-site VPN tunnel connection between an AWS VPC and a third-party CISCO ASA router
There are a couple ways of achieving this:
Of the two options, this blog explores how a VPN tunnel can be created using Openswan.
Setting up a VPN Tunnel on an AWS platform using Openswan
This can be explained using the following use case.
Let us assume we have a Java application deployed on multiple AWS EC2 instances inside a private subnet. There is a need to retrieve data from an external third-party API and this API is not accessible as a public API. Thus, a site-to-site VPN tunnel needs be created between the Java application instance(s) and the third-party external API.
There are four main steps in creating a VPN tunnel using Openswan;
The following prerequisites should be met to execute the first step
You are now ready to proceed with VPN tunnel creation.
Step 01: Create an EC2 instance to install Openswan
Go to the Route Tables from the side bar and select your route table of the private subnet. Go to
Routes tab and add inbound rule. Edit routes and add another route.
Destination > Private IP of third party/32 (172.25.75.98/32 in our
scenario)
Target > Select Openswan instance from the list.
All the traffic received from the third-party IP address as the destination will route to the
Openswan instance. Go to the Route Tables from the side bar and select your route table of public
subnet. Next, Go to Routes tab and add inbound rule. Edit routes and add another route.
Destination > Private IP of third party/32 (172.25.75.98/32 in our
scenario)
Target > Select Openswan instance from the list.
This will direct traffic between the Openswan instance and the Third-party network. Now you have a
public EC2 instance to install Openswan and all the traffic routes are configured as needed.
Step 02: Install Openswan inside the EC2 instance and configure the tunnel
The next step is to add configurations for the VPN tunnel into the cisco-vpn.conf file. The configurations for this use case are as follows. Ensure you change the values based on your IP addresses;
                conn cisco-vpn
                type=tunnel
                authby=secret
                left=10.1.0.6 # private ip of openswan instance
                leftid= 54.32.58.45 #public ip of openswan instance
                leftsubnets={10.1.0.6/32,10.1.0.160/32,10.1.0.179/32} # private ip of   #openswan/32 and private ip of java application instances/32
                right=125.10.1.100 # public ip of the third party network
                rightsubnets=172.25.75.98/32 # private ip of the third party network
                esp=aes192-sha1
                keyexchange=ike
                ike=aes192-sha1
                salifetime=42200s
                pfs=yes
                auto=start
                dpdaction=restart
Before proceeding with the next step, carry out configurations on the CISCO end. Contact the system admin of the third-party network and complete the following task with him/her.
Next, create the following file.
vi /etc/ipsec.d/cisco-vpn.secrets
Add the following record.
<Public IP of Openswan instance> <Public IP of third-party network: PSK
“<PSK>”
Eg: 54.32.58.45 125.10.1.100: PSK “CGhdgddgheehehs” (This is for our scenario)
Now all configurations are complete.
Note: You can call third party network using DNS or private IP address. If you are using DNS, you
have to add a record to the /etc/hosts file as follows to resolve the DNS.
<private IP of Third party> <DNS name of the third party>
Step 3: Test the VPN tunnel
If you are connected through telnet, you have successfully created the site-to-site VPN between the AWS platform and the third-party CISCO ASA network.
Congratulations!
References
Openswan - www.openswan.org

Ridma Gamage
Senior Software EngineerDeveloping a Custom Audit Trail and a Notification Service for a Workflow Based Serverless Application on AWS
READ ARTICLE
Human Emotions Recognition through Facial Expressions and Sentiment Analysis for Emotionally Aware Deep Learning Models
READ ARTICLE