Developing a Custom Audit Trail and a Notification Service for a Workflow Based Serverless Application on AWS
Nowadays, most complex enterprise systems are required to have a good user action tracking system or a real time notification system. Having such a system can be beneficial to all stakeholders of these systems.
This blog talks about how to implement a custom audit trail and a notification service for a serverless application deployed on AWS.
The Solution Architecture
The solution architecture of this sample workflow application can be explained as below. The complete architecture is explained using multiple steps, and each of these steps is conceptualized in Figure 01.
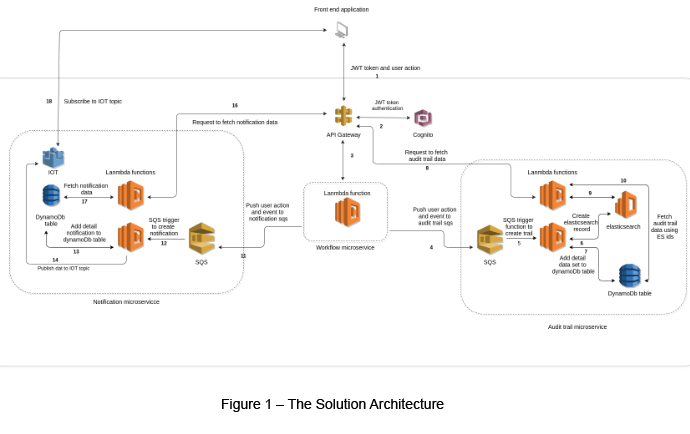
Step 1 - User Action
Application users can save, request, approve or reject workflow data. We use a common microservice to handle all these actions. Here we can identify each user action by attaching a user action type to the request body.
Step 2 – The Authorization Process
The authorization process is handled by a JWT token (included within the user request) via the API Gateway and AWS Cognito.
Step 3 / 4 / 11 - Execute the Workflow Update Lambda Function
After a successful authorization process, the user request is forwarded to a Lambda function via an API Gateway.
The following (Figure 02) is a sample Lambda function with a simple workflow update. As you can see, just after the workflow logic, the process is pushing the audit trail and notification data sets via its respective SQS queues.
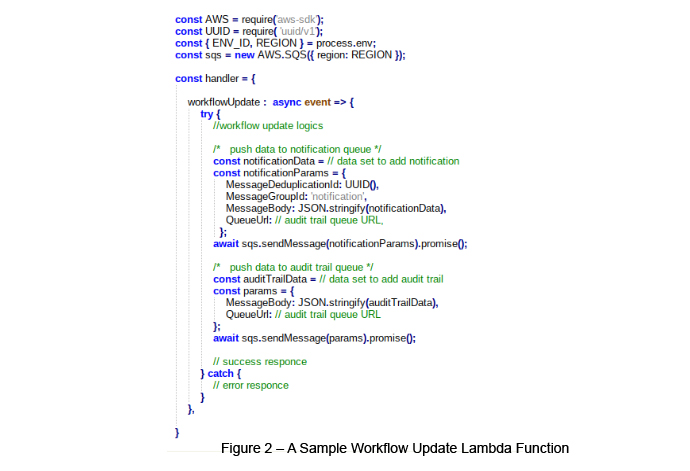
Step 5 / 12 - SQS Triggers a Lambda Function
Once the request comes to the respective SQS queue, we can set triggers to invoke the respective Lambda function.
In this scenario, we set the createAuditTrail Lambda function for the audit trail queue and the sendNotifications Lambda function for the notification queue.
The following (Figure 04) shows how we can create an AWS Lambda function within a serverless.yaml file and we how we can set an audit trail queue as an event trigger for this Lambda function.
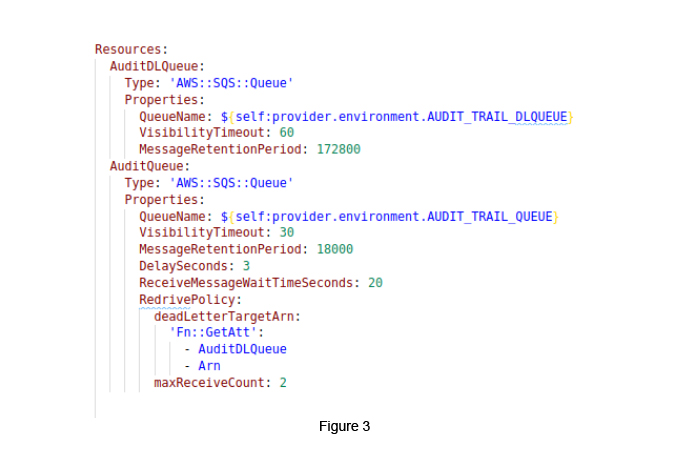
When we push the audit trail data set to the audit trail queue, it will wait for the time to trigger the Lambda function. If it fails, the data moves to the dead letter queue and it will retry to trigger a new Lambda function. The same process can be followed for executing the sendNotification function using the notification queue.

Step 6 / 7 - Create an Elasticsearch Record
To speed up the audit trail data fetches and searching, we can use the Elasticsearch service. In this process, it is required to identify certain domains to store the audit trail data, rather than storing the entire audit trail data set within the Elasticsearch service. We need to identify a searchable dataset (e.g. scheme, workflow id, step id, action owner) and create a dataset id, as a result. After this, we need to store our full dataset within the DynamoDB table. We can use dataset id as a primary key. It is easy to get a full data set using Elasticsearch results.
Step 13 / 14 Send Notifications
Finally, it is required to create a notification dataset using the respective action and to store this data within the DynamoDB table. We can set the notificationId as a primary key.
After this, it is required to send related notifications to relevant recipients. We can use a socket connection to achieve this task. In our example, we use AWS IOT.
As the first step, it is required to create an AWS IOT socket connection properly when a user logs in to the system. We can use “aws-iot-device-sdk” module [4] for React applications.
In addition to this, topics can be used to subscribe and publish our data.
EX - topic => notifications-64ea2780-c371-11eb-a905-a3c ( notifications-{ userId} )
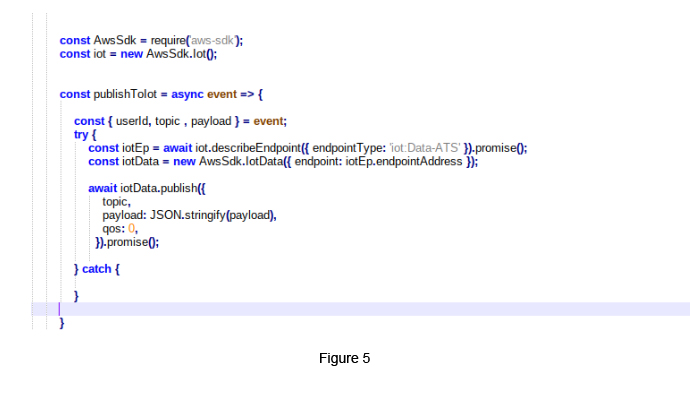
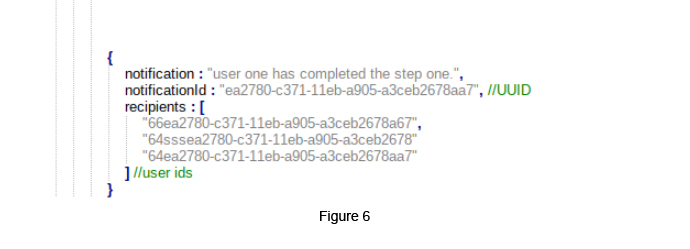
The above illustrates how we can publish our data to an IOT socket (Figure 05). We can create topics using recipient ids (Figure 06). The payload is an object, which includes a notification and a notificationId.
References
- www.docs.aws.amazon.com/lambda/latest/dg/welcome.html
- www.docs.aws.amazon.com/iot/latest/developerguide/protocols.html
- www.aws.amazon.com/elasticsearch-service/getting-started
- www.www.npmjs.com/package/aws-iot-device-sdk

Gayashan Galagedara
Senior Software EngineerDeveloping a Custom Audit Trail and a Notification Service for a Workflow Based Serverless Application on AWS
READ ARTICLE
Human Emotions Recognition through Facial Expressions and Sentiment Analysis for Emotionally Aware Deep Learning Models
READ ARTICLE
