AWS Textract with Lambda Walkthrough
AWS Textract is a document text extraction service. “Amazon Textract is based on the same proven, highly scalable, deep-learning technology that was developed by Amazon’s computer vision scientists to analyze billions of images and videos daily. You don’t need any machine learning expertise to use it” — AWS Docs
This post will provide a walkthrough of several use cases of the AWS Textract service using AWS Lambda with Python implementations. Mainly:
Prerequisites
You need to have an AWS account and some basic knowledge working with AWS services. The following AWS services will be utilized throughout this guide.
You will learn
Adding boto3
Since Lambda functions are executed in an AWS hosted runtime, some of the latest packages that are used by the Lambda code needs to be uploaded manually. In order to use AWS Textract in Python, the latest “boto3” package is needed, which is not currently available in AWS Lambda hosted environments as of this writing, which is needed to be downloaded and uploaded as an AWS Lambda “Layer”. You can follow the below steps to complete this.
1.Python dependency manager “PIP” is needed to download the “boto3” package.
2.Execute following command in command shell. pip install — target ./python boto3
3.After the package is downloaded, Zip the “python” folder. Alternatively, the zipped “boto3-layer” can be grabbed from here.
4.Go to AWS Lambda -> Layers and click “Create Layer”.
5.Give a layer name, select the latest python version and upload the zip file as below.
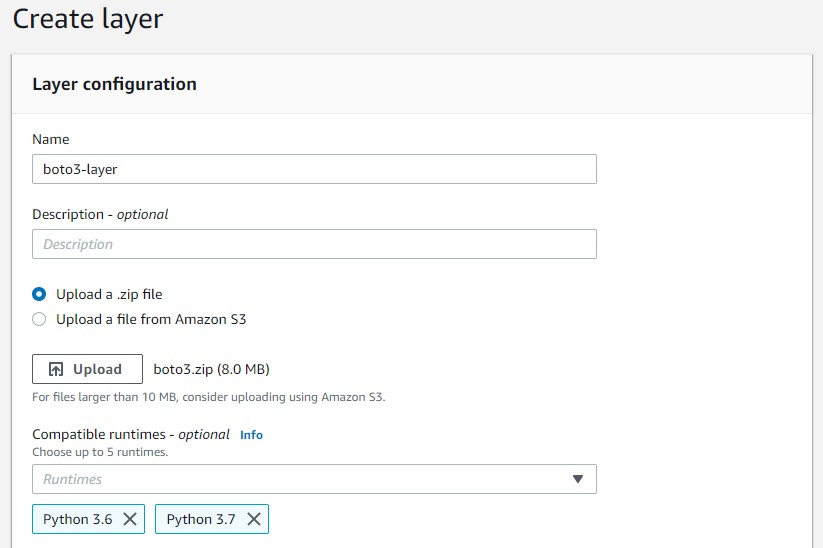
6. Click “Create”
This will create a “boto3" Python package for the AWS Textract SDK which will be used as a Lambda layer. Please note that “Compatible runtimes” should be the same as the Lambda function’s runtime which will use the layer.
1.Image Text Extraction
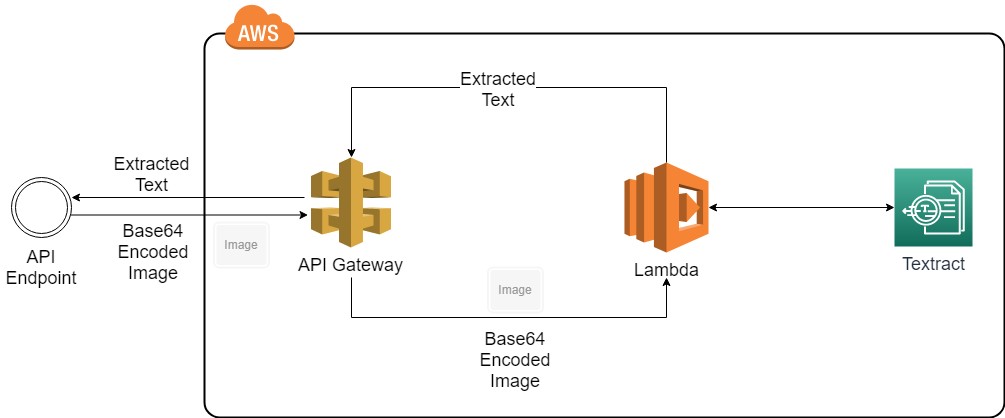
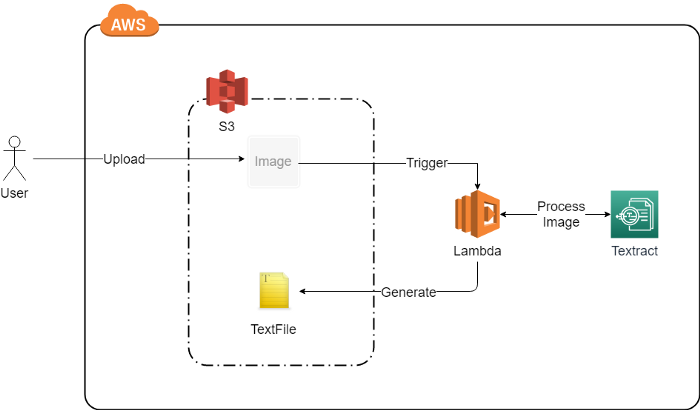
This section will focus on text extraction using images (JPEG/PNG). In the first example, a Base64 converted image will be directly used with AWS SDK to extract text. In the second example, an S3 bucket triggered Lambda will be used to automatically extract text when images are uploaded to the S3 bucket and write each result to a text file in the S3 bucket.
1.1 Extracting Text from a Base64 Image
1.1.1 Creating The Lambda Function
1.Go to the AWS Lambda service and click “Create Function”.
2.Give a “Function name” as indicated below and provide the “Execution role” as “Create a new role from AWS policy templates” and enter a “Role name” as well. Note that “Runtime” is selected as “Python 3.6”. This is compatible with the “boto3-layer” created previously as the specified runtimes were both “Python 3.6” and “Python 3.7”.
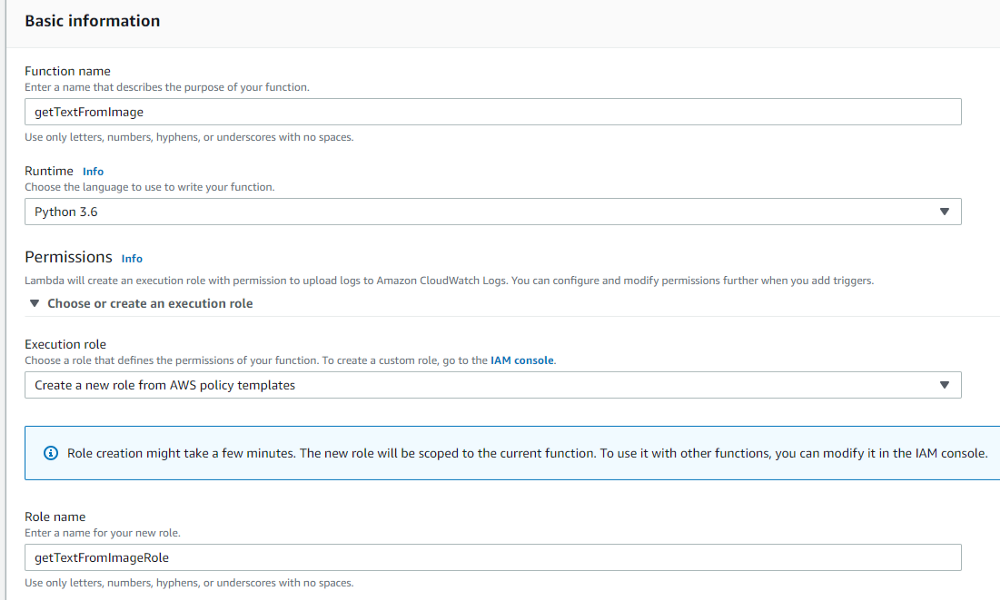
3.Click “Create function”.
1.1.2 Attaching Permission Policies to Lambda
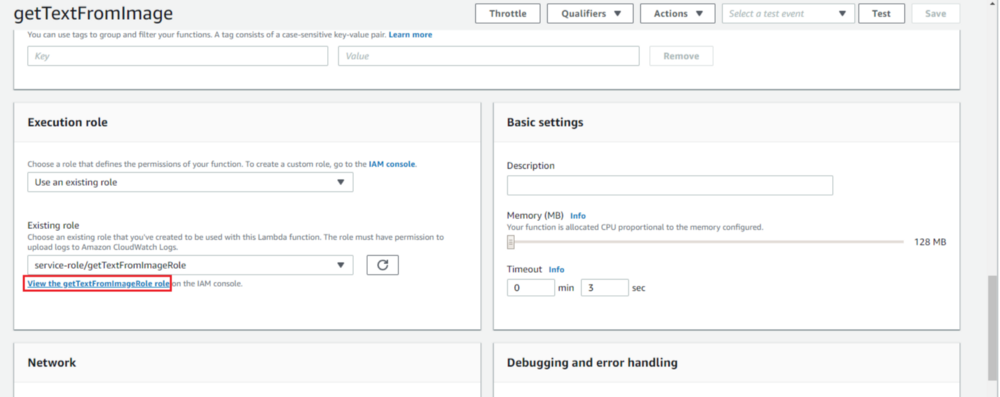
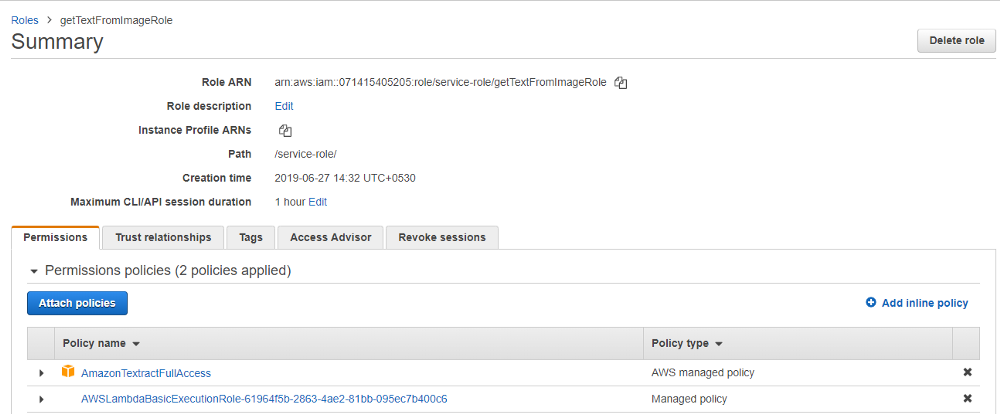
1.Once Lambda is created, click on “View the getTextFromImageRole role” under the “Execution role” section in the Lambda configuration window as displayed below.
2. This will open the “getTextFromImageRole” configuration page as below. Click “Attach policy”. Then select “AmazonTextractFullAccess” policy and click “Attach policy” as displayed below. This will give the Lambda function permission to access the AWS Textract service.
1.1.3 Adding a Custom “boto3-layer” to Lambda
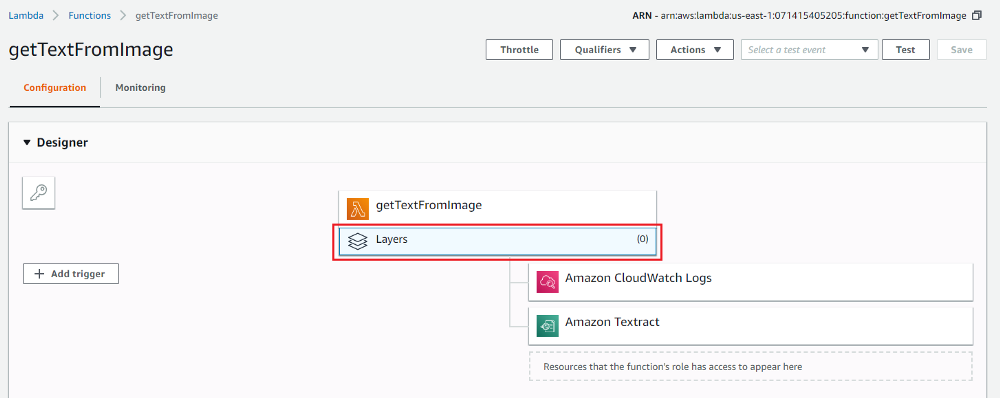
1.Click “Layers” in the Lambda designer and then click “Add a layer” as indicated below. This will help add the “boto3-layer” that was created previously.
2.Select the “boto3-layer” under “Compatible layers” and then select version 1 as below.

3.Click “Save” in the Lambda configuration.
1.1.4 Implementing Lambda Code
Go to the Lambda code editor and paste the code below.
This code expects a Json body with an “Image” parameter and its value as the Base64 encoded image string. A sample payload which you can use is displayed below.
1.1.5 Exposing The Lambda Using API Gateway
Currently, the Lambda is not exposed over public internet. This needs to be exposed via an AWS API Gateway endpoint. You can follow the steps below.
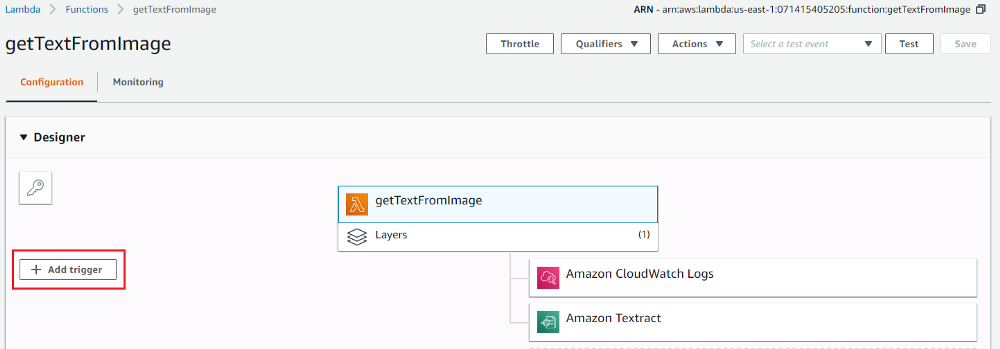
1.Click on “Add trigger” from the Lambda configuration page.
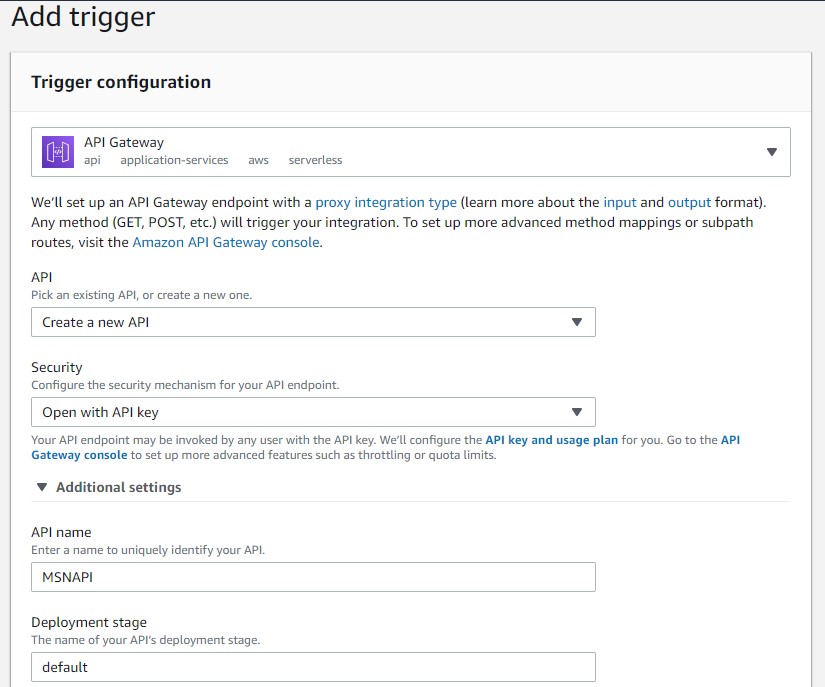
2.Select “API Gateway” and fill out details as below. Note that “Security” is set to “Open with API key” to protect Lambda from anonymous access.
3.Click “Add”.
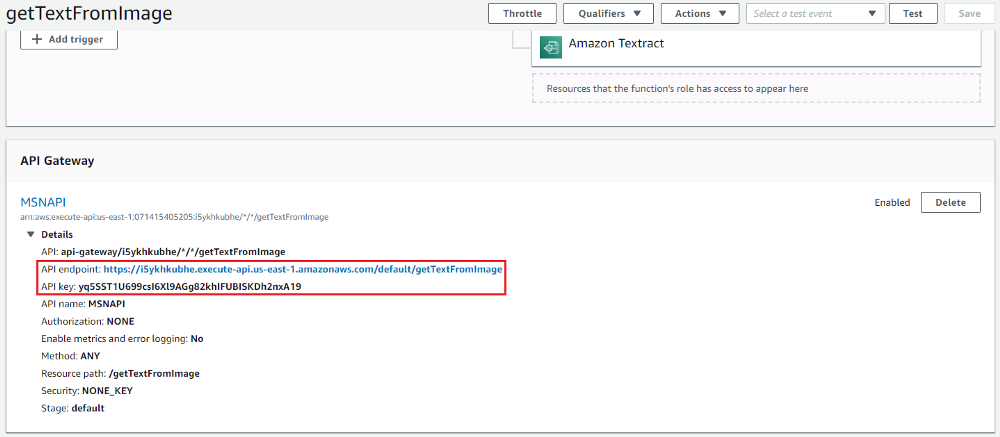
4.Go to the Lambda configuration page and expand the “API Gateway” section to get the API endpoint and the API key as displayed below.
1.1.6 Invoking The Lambda Function
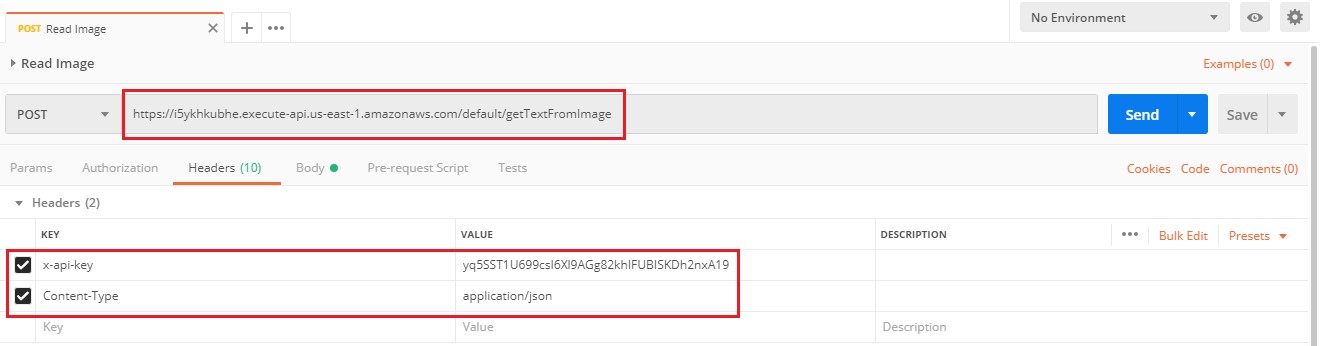
Use an API testing tool to invoke the endpoint. In this example “Postman” is used.
1.Add the API endpoint with headers “x-api-key” with the value of “API Key” and “Content-Type” as “application/json”.
2.Copy the sample body provided in section “1.1.4” into the raw body section as below.
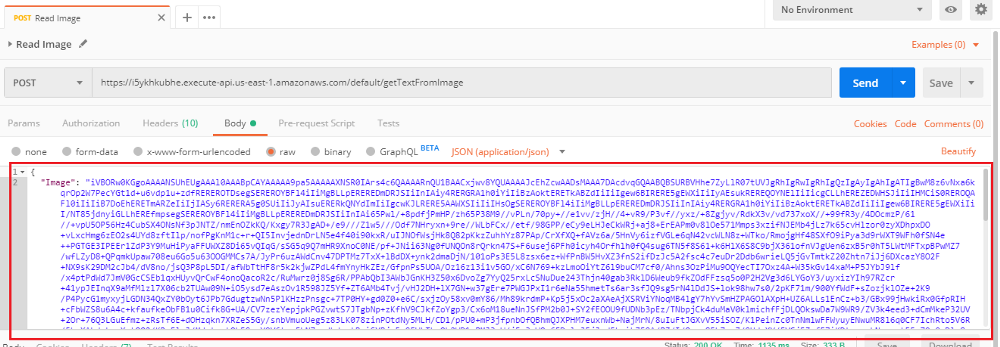
3. Execute the call and the response will return with the extracted text as below.

1.2 Extracting Text from an S3 Bucket Image
This will consist of a Lambda function which gets triggered whenever an image gets uploaded to the S3 Bucket. Follow the steps below and create the S3 bucket.
1.2.1 Creating the S3 Bucket
1.Go to the AWS S3 page and click “Create bucket”.
2.Enter “Bucket name” and “Region” same as the region that will be used in the Lambda function and click “Next”.
3.In the “Set permissions” section, set the permissions as below.
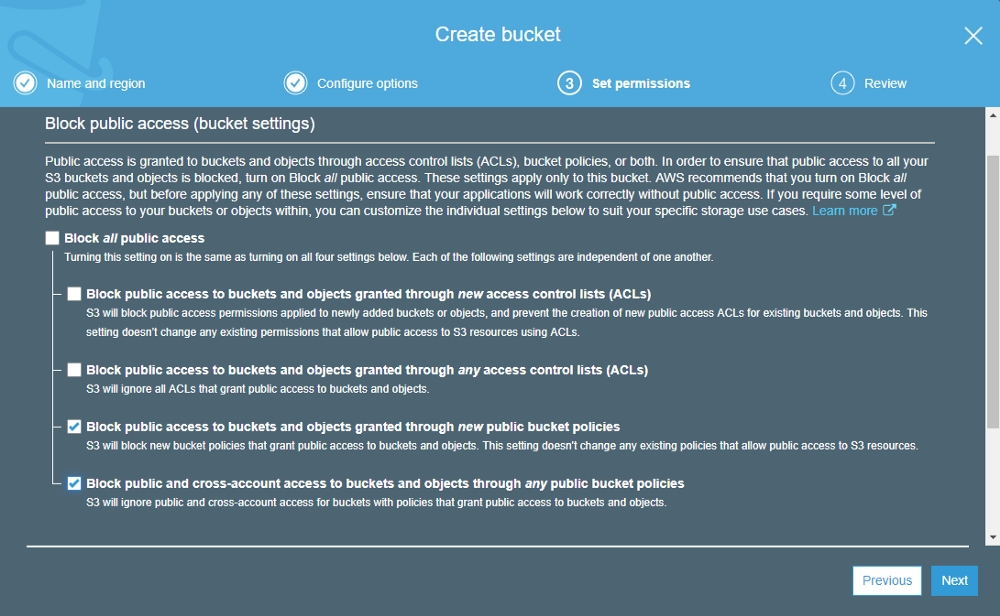
4.Click “Create bucket”.
1.2.2 Creating The S3 Lambda Trigger
Follow the steps below to create a Lambda that will be executed upon new image uploads.
1.Go to the AWS Lambda service page and click “Create function”.
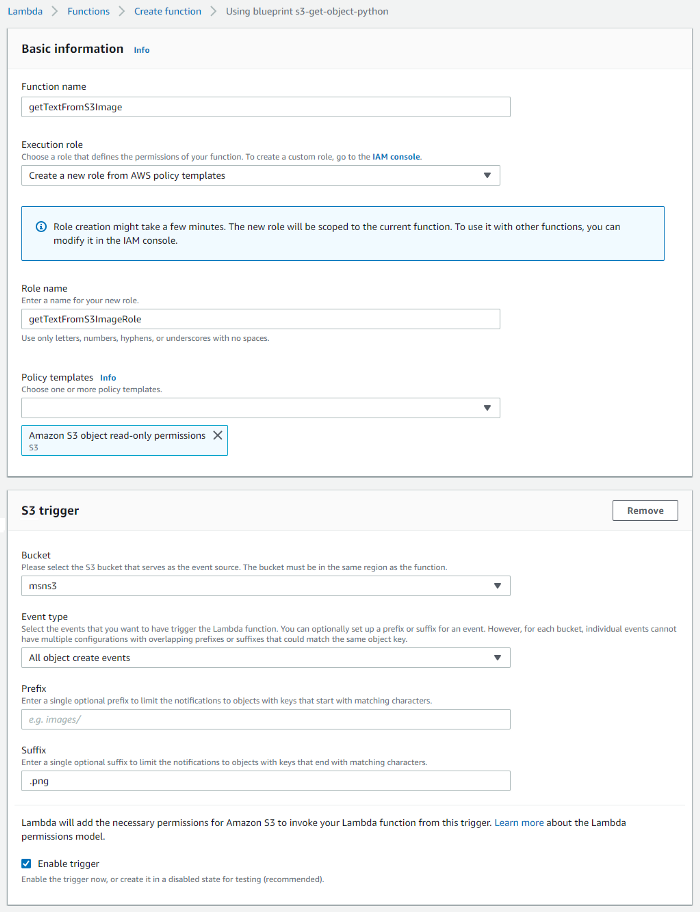
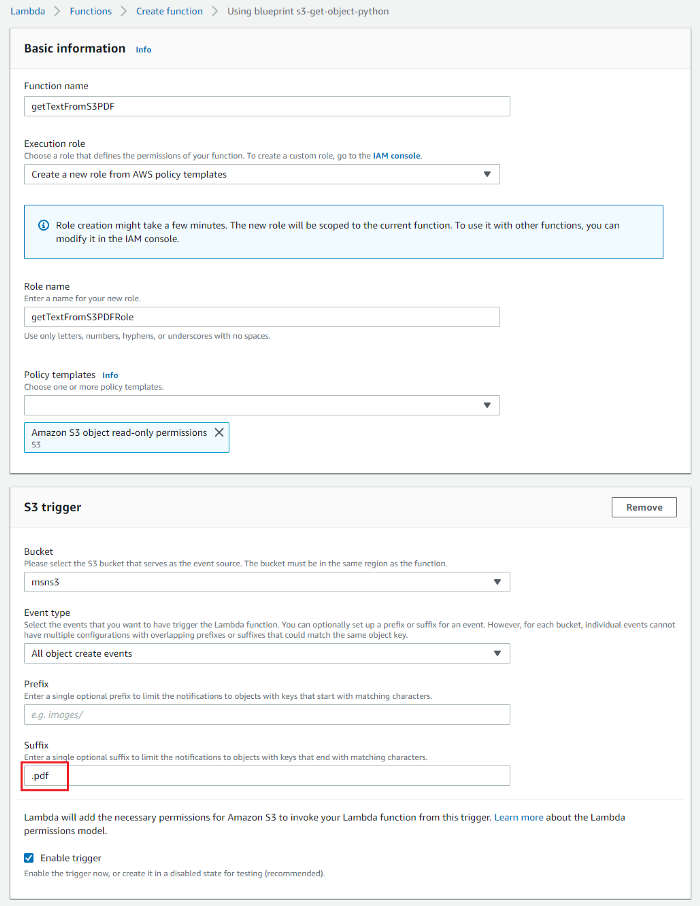
2.Select “Use a blueprint” and search for “s3-get-object-python” template and click “Configure”.
3.Enter “Function name”, “Role name” and select the “Bucket name” as the S3 bucket created in the previous step. Make sure to add “Suffix” to restrict the trigger only for PNG images. Fill out the rest of the settings as below.
4. Click “Create function” and copy the code below. The below code will send the uploaded image to the AWS Textract and write the response as a text file with the same name to the S3 bucket.
5.Follow the steps in section “1.1.2” and add “AmazonTextractFullAccess” and “AmazonS3FullAccess” policies to the “getTextFromS3ImageRole” role that was created for this Lambda. This will provide access to both AWS Textract and S3 services.
6.Please follow the steps in section “1.1.3” and add the “boto3-layer” to the “getTextFromS3Image” Lambda.
1.2.3 Testing The S3 Lambda Trigger
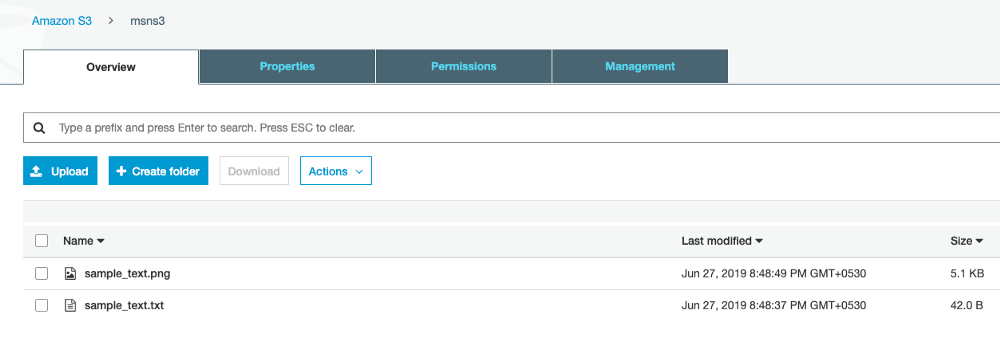
Go to the S3 bucket created in step 1.2.1 and upload a png image with some text. You can download a sample image here.
Once the image is uploaded, after a few seconds, the extracted text file should be created in the same location with the same name as displayed below.
2.Extracting PDF Text from an S3 Bucket Document
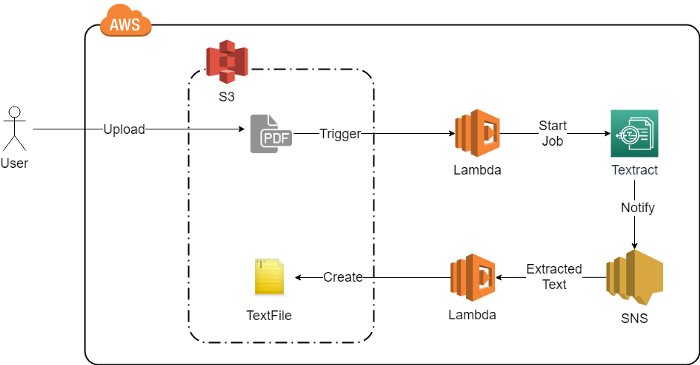
This example will implement a Lambda which will be triggered whenever a PDF document is uploaded to the S3 bucket. The Lambda function will start a text extraction processing job. Once the AWS Textract completes the job, it will send a notification to the AWS Simple Notification Service which will trigger another Lambda. The Lambda triggered from the AWS SNS Service will get the text extraction job result from the payload. It will write the results to a text file in the S3 bucket with the same name as the PDF.
2.1 Creating the S3 Triggered Lambda Function
1.Create another S3 triggered Lambda function following steps listed in section 1.2.2, with the only difference being instead of the suffix “png” the suffix “pdf” will be used to trigger PDF documents.
2.Follow the steps in section 1.1.2 and add “AmazonTextractFullAccess” and “AmazonS3FullAccess” policies to the “getTextFromS3PDFRole” role that was created for this Lambda. This will provide access to both AWS Textract and S3 services.
3. Follow the steps in section 1.1.3 and add the “boto3-layer” to the “getTextFromS3PDF” Lambda.
The API method “StartDocumentTextDetection” is asynchronous. This method starts a text extraction process and returns the “JobId”. Once the text extraction process is completed, it will trigger a notification to the AWS Simple Notification Service. Follow the below steps to create an AWS SNS.
2.2 Creating The AWS SNS Topic
A Simple Notification Service topic is needed for Textract service to send a job completed notification along with “JobId”. Follow following steps to create a topic.
1.Go to AWS SNS service -> Topics and click “Create topic”.
2.Enter a Name, keep the rest of the settings as default and create the topic as below.

2.3 Creating an IAM Role AWS SNS Access
An IAM Role is needed to get access to the AWS SNS service for AWS Textract to successfully send notifications.
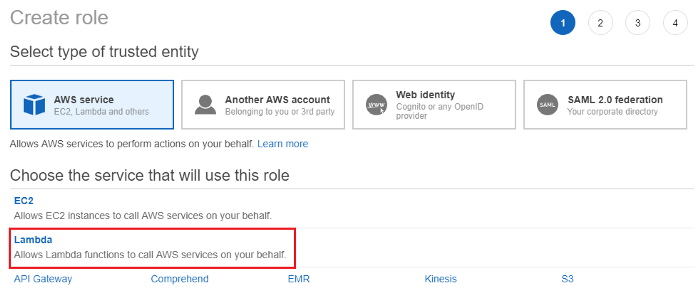
1.Go to IAM -> Roles and click “Create role”.
2.Select Lambda as the “Service that will use this role”.
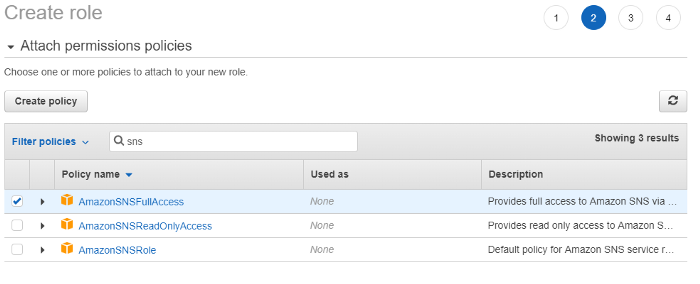
3.Go to the “Permissions” section and add the “AmazonSNSFullAccess” policy.
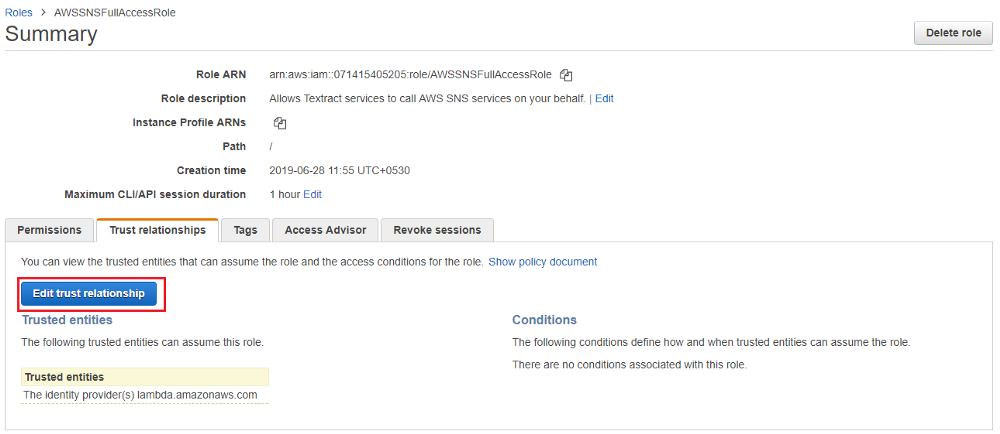
4.Give the role name as “AWSSNSFullAccessRole” and create the role. Please note, under “Trusted entities” Lambda service is provided. This is because the AWS Textract service was not available to be selected in the initial “Create role” page. We need to change the “Lambda” service to “Textract” service.
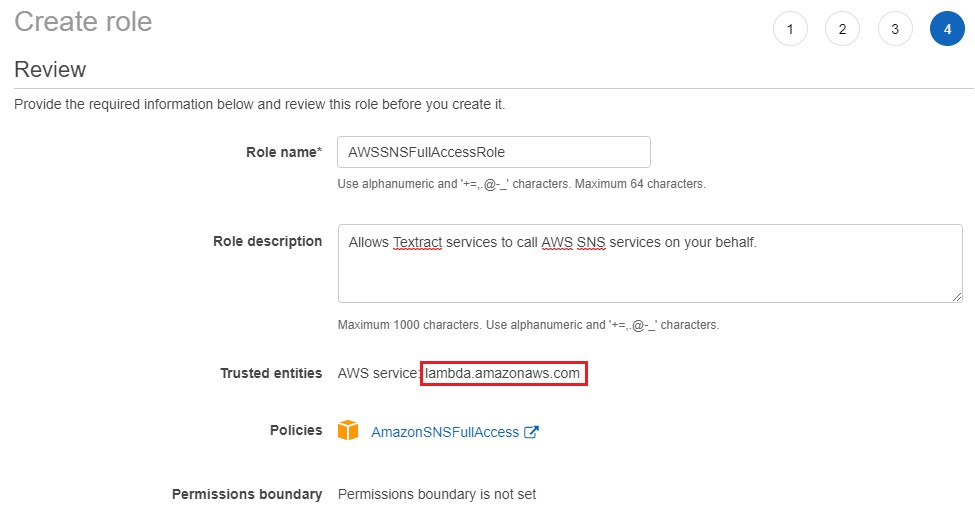
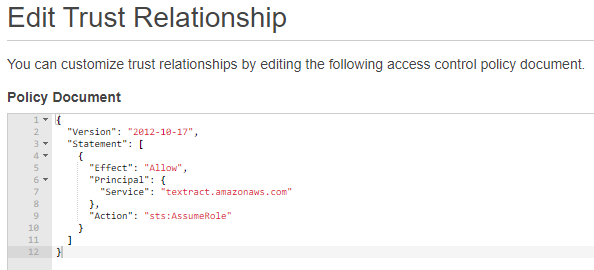
5.Go to “AWSSNSFullAccessRole” role settings and go to “Trust relationships” and click “Edit trust relationship”.
6.Change lambda.amazonaws.com to textract.amazonaws.com and update the trust policy. AWS Textract service will now have permission to send notifications to AWS SNS.
2.4 Implementing The PDF Triggered Lambda
1.Go to the “getTextFromS3PDF” Lambda code editor and paste the code below.
2. Replace
3. Replace
2.5 Creating the AWS SNS Triggered Lambda Function
This Lambda will be triggered once the notification indicating that the text extraction job is completed is delivered from the AWS Textract service.
1.Create a new Lambda function from scratch with the name “writePDFResultToS3”.

2. Follow the steps in section 1.1.2 and add “AmazonTextractFullAccess” and “AmazonS3FullAccess” policies to the “writePDFResultToS3Role” role that was created for this Lambda. This will provide access to both AWS Textract and S3 services.
3.Follow the steps in section 1.1.3 and add the “boto3-layer” to the “writePDFResultToS3” Lambda.
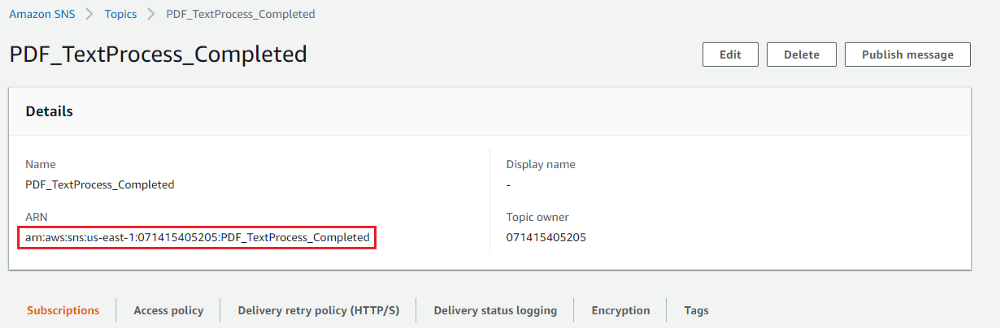
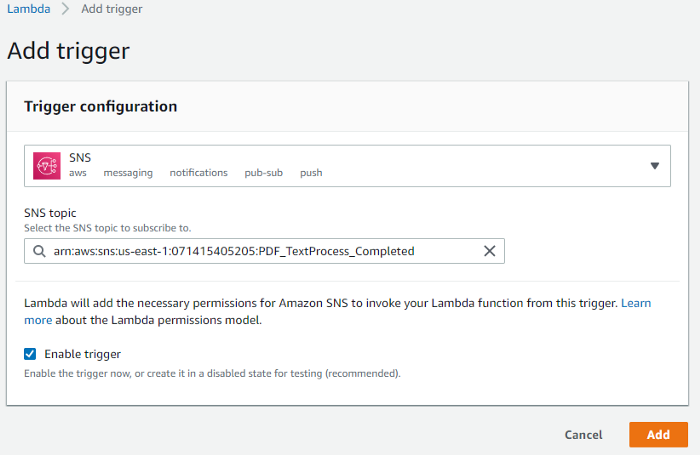
4. Click “Add trigger” from the Lambda designer and configure the subscription to the “PDF_TextProcess_Completed” topic that was created in step 2.2 and add the trigger.
5.Go to the “writePDFResultToS3” Lambda code editor and paste the code below. This code will check if the job status is “SUCCEEDED” and retrieve the job result using the “JobId”, process the result into a text file with the same name as the PDF file and write it to the S3 bucket.
2.6 Testing PDF Text Extraction
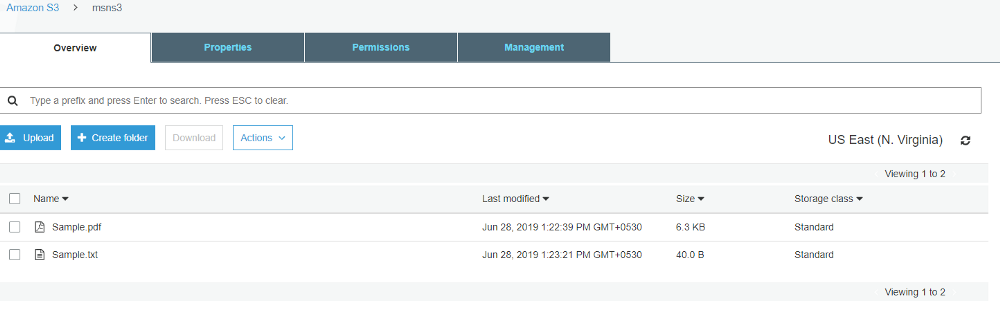
Go to the S3 bucket and upload a PDF file. You can get a sample PDF file from here. After about 1 minute a text file with the same name as the PDF will be generated. This text file contains the text result extracted from the PDF.
Summary
You have seen several ways of utilizing AWS Textract services. Using available AWS SDKs, the possibilities of integrating these services into your applications are endless.
References
- Automatically extract text and structured data from documents with Amazon Textract | Amazon Web…
- Limits in Amazon Textract - Amazon Textract
- Object Key and Metadata - Amazon Simple Storage Service
- AWS Lambda - Serverless Compute - Amazon Web Services
- Amazon Simple Notification Service (SNS) | AWS
- Cloud Object Storage | Store & Retrieve Data Anywhere | Amazon Simple Storage Service
- AWS Identity & Access Management

Suminda De Silva
Senior Software EngineerDeveloping a Custom Audit Trail and a Notification Service for a Workflow Based Serverless Application on AWS
READ ARTICLE
Human Emotions Recognition through Facial Expressions and Sentiment Analysis for Emotionally Aware Deep Learning Models
READ ARTICLE